|
|
<div align=center>
|
|
|
<a href="http://dface.tech" target="_blank"><img src="http://dftech.oss-cn-hangzhou.aliyuncs.com/web/DFACE-logo_dark.png" width="350"></a>
|
|
|
</div>
|
|
|
|
|
|
-----------------
|
|
|
# DFace (Deeplearning Face) • [](https://opensource.org/licenses/Apache-2.0)
|
|
|
|
|
|
|
|
|
| **`Linux CPU`** | **`Linux GPU`** | **`Mac OS CPU`** | **`Windows CPU`** |
|
|
|
|-----------------|---------------------|------------------|-------------------|
|
|
|
| [](http://dftech.oss-cn-hangzhou.aliyuncs.com/opendface/img/build_pass.svg) | [](http://dftech.oss-cn-hangzhou.aliyuncs.com/opendface/img/build_pass.svg) | [](http://dftech.oss-cn-hangzhou.aliyuncs.com/opendface/img/build_pass.svg) | [](http://dftech.oss-cn-hangzhou.aliyuncs.com/opendface/img/build_pass.svg) |
|
|
|
|
|
|
|
|
|
**基于多任务卷积网络(MTCNN)和Center-Loss的多人实时人脸检测和人脸识别系统。**
|
|
|
|
|
|
|
|
|
[Github项目地址](https://github.com/kuaikuaikim/DFace)
|
|
|
|
|
|
[Slack 聊天组](https://dfaceio.slack.com/)
|
|
|
|
|
|
|
|
|
|
|
|
**DFace** 是个开源的深度学习人脸检测和人脸识别系统。所有功能都采用 **[pytorch](https://github.com/pytorch/pytorch)** 框架开发。pytorch是一个由facebook开发的深度学习框架,它包含了一些比较有趣的高级特性,例如自动求导,动态构图等。DFace天然的继承了这些优点,使得它的训练过程可以更加简单方便,并且实现的代码可以更加清晰易懂。
|
|
|
DFace可以利用CUDA来支持GPU加速模式。我们建议尝试linux GPU这种模式,它几乎可以实现实时的效果。
|
|
|
所有的灵感都来源于学术界最近的一些研究成果,例如 [Joint Face Detection and Alignment using Multi-task Cascaded Convolutional Networks](https://arxiv.org/abs/1604.02878) 和 [FaceNet: A Unified Embedding for Face Recognition and Clustering](https://arxiv.org/abs/1503.03832)
|
|
|
|
|
|
|
|
|
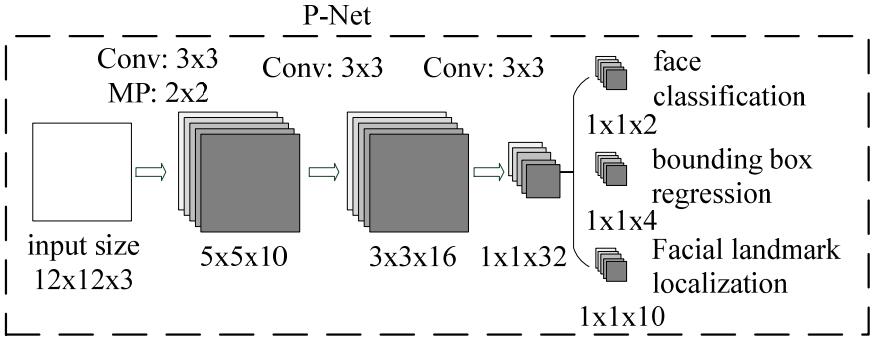
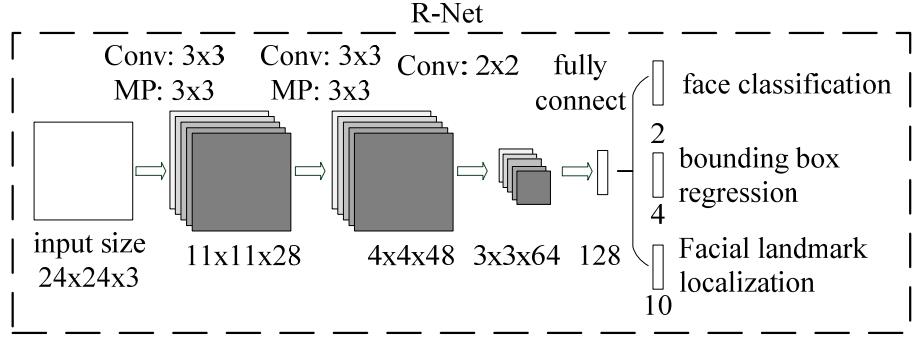
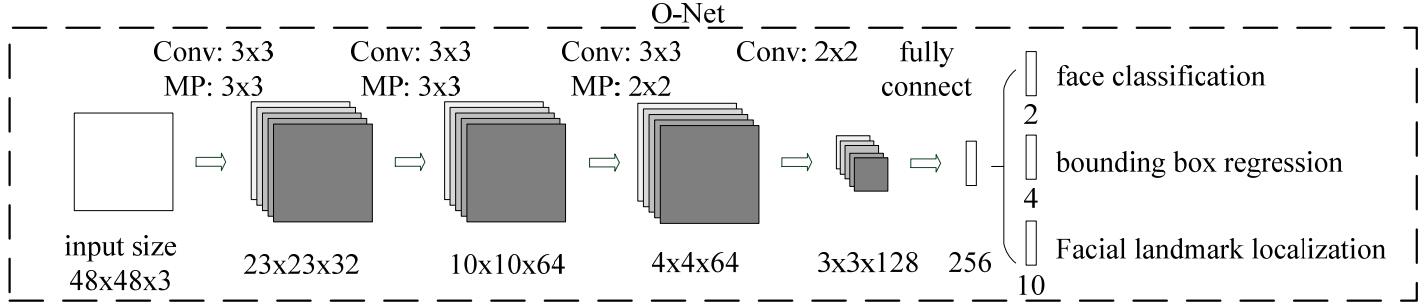
**MTCNN 结构**
|
|
|
|
|
|
|
|
|
|
|
|
|
|
|
|
|
|
|
|
|
**如果你对DFace感兴趣并且想参与到这个项目中, 以下TODO是一些需要实现的功能,我定期会更新,它会实时展示一些需要开发的清单。提交你的fork request,我会用issues来跟踪和反馈所有的问题。也可以加DFace的官方Q群 681403076 也可以加本人微信 jinkuaikuai005**
|
|
|
|
|
|
### TODO(需要开发的功能)
|
|
|
- 基于center loss 或者triplet loss原理开发人脸对比功能,模型采用ResNet inception v2. 该功能能够比较两张人脸图片的相似性。具体可以参考 [Paper](https://arxiv.org/abs/1503.03832)和[FaceNet](https://github.com/davidsandberg/facenet)
|
|
|
- 反欺诈功能,根据光线,质地等人脸特性来防止照片攻击,视频攻击,回放攻击等。具体可参考LBP算法和SVM训练模型。
|
|
|
- 3D人脸反欺诈。
|
|
|
- mobile移植,根据ONNX标准把pytorch训练好的模型迁移到caffe2,一些numpy算法改用c++实现。
|
|
|
- Tensor RT移植,高并发。
|
|
|
- Docker支持,gpu版
|
|
|
|
|
|
## 安装
|
|
|
DFace主要有两大模块,人脸检测和人脸识别。我会提供所有模型训练和运行的详细步骤。你首先需要构建一个pytorch和cv2的python环境,我推荐使用Anaconda来设置一个独立的虚拟环境。**如果使用GPU训练模式,需要安装Nvidia的cuda和cudnn。** 目前作者倾向于Linux Ubuntu安装环境。感谢热心网友提供windows DFace安装体验,windos安装教程具体
|
|
|
可参考他的[博客](http://www.alearner.top/index.php/2017/12/23/dface-pytorch-win64-gpu)
|
|
|
|
|
|
|
|
|
### 依赖
|
|
|
* cuda 8.0
|
|
|
* anaconda
|
|
|
* pytorch
|
|
|
* torchvision
|
|
|
* cv2
|
|
|
* matplotlib
|
|
|
|
|
|
```shell
|
|
|
git clone https://gitee.com/kuaikuaikim/dface.git
|
|
|
```
|
|
|
|
|
|
在这里我提供了一个anaconda的环境依赖文件environment.yml (windows请用environment-win64.yml,Mac OSX请用environment_osx.yaml),它能方便你构建自己的虚拟环境。
|
|
|
|
|
|
```shell
|
|
|
cd dface
|
|
|
|
|
|
conda env create -f environment.yml
|
|
|
```
|
|
|
|
|
|
添加python搜索模块路径
|
|
|
|
|
|
```shell
|
|
|
export PYTHONPATH=$PYTHONPATH:{your local DFace root path}
|
|
|
```
|
|
|
|
|
|
|
|
|
|
|
|
### 人脸识别和检测
|
|
|
|
|
|
如果你对mtcnn模型感兴趣,以下过程可能会帮助到你。
|
|
|
|
|
|
#### 训练mtcnn模型
|
|
|
|
|
|
MTCNN主要有三个网络,叫做**PNet**, **RNet** 和 **ONet**。因此我们的训练过程也需要分三步先后进行。为了更好的实现效果,当前被训练的网络都将依赖于上一个训练好的网络来生成数据。所有的人脸数据集都来自 **[WIDER FACE](http://mmlab.ie.cuhk.edu.hk/projects/WIDERFace/)** 和 **[CelebA](http://mmlab.ie.cuhk.edu.hk/projects/CelebA.html)**。WIDER FACE仅提供了大量的人脸边框定位数据,而CelebA包含了人脸关键点定位数据。以下训练除了 生成ONet的人脸关键点训练数据和标注文件 该步骤使用CelebA数据集,其他一律使用WIDER FACE。如果使用wider face的 wider_face_train.mat 注解文件需要转换成txt格式的,我这里用h5py写了个 [转换脚本](https://gitee.com/kuaikuaikim/dface/blob/master/dface/prepare_data/widerface_annotation_gen/transform.py). 这里我提供一个已经转换好的wider face注解文件 [anno_store/wider_origin_anno.txt](https://gitee.com/kuaikuaikim/dface/blob/master/anno_store/wider_origin_anno.txt), 以下训练过程参数名--anno_file默认就是使用该转换好的注解文件。
|
|
|
|
|
|
|
|
|
* 创建 dface 训练数据临时目录,对应于以下所有的参数名 --dface_traindata_store
|
|
|
```shell
|
|
|
mkdir {your dface traindata folder}
|
|
|
```
|
|
|
|
|
|
|
|
|
* 生成PNet训练数据和标注文件
|
|
|
|
|
|
```shell
|
|
|
python dface/prepare_data/gen_Pnet_train_data.py --prefix_path {注解文件中图片的目录前缀,就是wider face图片所在目录} --dface_traindata_store {之前创建的dface训练数据临时目录} --anno_file {wider face 注解文件,可以不填,默认使用anno_store/wider_origin_anno.txt}
|
|
|
```
|
|
|
* 乱序合并标注文件
|
|
|
|
|
|
```shell
|
|
|
python dface/prepare_data/assemble_pnet_imglist.py
|
|
|
```
|
|
|
|
|
|
* 训练PNet模型
|
|
|
|
|
|
|
|
|
```shell
|
|
|
python dface/train_net/train_p_net.py
|
|
|
```
|
|
|
* 生成RNet训练数据和标注文件
|
|
|
|
|
|
```shell
|
|
|
python dface/prepare_data/gen_Rnet_train_data.py --prefix_path {注解文件中图片的目录前缀,就是wider face图片所在目录} --dface_traindata_store {之前创建的dface训练数据临时目录} --anno_file {wider face 注解文件,可以不填,默认使用anno_store/wider_origin_anno.txt} --pmodel_file {之前训练的Pnet模型文件}
|
|
|
```
|
|
|
* 乱序合并标注文件
|
|
|
|
|
|
```shell
|
|
|
python dface/prepare_data/assemble_rnet_imglist.py
|
|
|
```
|
|
|
|
|
|
* 训练RNet模型
|
|
|
|
|
|
```shell
|
|
|
python dface/train_net/train_r_net.py
|
|
|
```
|
|
|
|
|
|
* 生成ONet训练数据和标注文件
|
|
|
|
|
|
```shell
|
|
|
python dface/prepare_data/gen_Onet_train_data.py --prefix_path {注解文件中图片的目录前缀,就是wider face图片所在目录} --dface_traindata_store {之前创建的dface训练数据临时目录} --anno_file {wider face 注解文件,可以不填,默认使用anno_store/wider_origin_anno.txt} --pmodel_file {之前训练的Pnet模型文件} --rmodel_file {之前训练的Rnet模型文件}
|
|
|
```
|
|
|
|
|
|
* 生成ONet的人脸五官关键点训练数据和标注文件
|
|
|
|
|
|
```shell
|
|
|
python dface/prepare_data/gen_landmark_48.py
|
|
|
```
|
|
|
|
|
|
* 乱序合并标注文件(包括人脸五官关键点)
|
|
|
|
|
|
```shell
|
|
|
python dface/prepare_data/assemble_onet_imglist.py
|
|
|
```
|
|
|
|
|
|
* 训练ONet模型
|
|
|
|
|
|
```shell
|
|
|
python dface/train_net/train_o_net.py
|
|
|
```
|
|
|
|
|
|
#### 测试人脸检测
|
|
|
|
|
|
**如果不想训练,我已经把onet_epoch.pt,pnet_epoch.pt,rnet_epoch.pt三个文件放到model_store目录,直接运行test_image.py即可**
|
|
|
|
|
|
```shell
|
|
|
python test_image.py
|
|
|
```
|
|
|
|
|
|
### 人脸对比
|
|
|
TODO 根据center loss实现人脸识别
|
|
|
|
|
|
#### 测试效果
|
|
|

|
|
|
|
|
|
|
|
|
### QQ交流群(模型获取请加群)
|
|
|
|
|
|
#### 681403076
|
|
|
|
|
|

|
|
|
|
|
|
#### 本人微信
|
|
|
|
|
|
##### jinkuaikuai005
|
|
|
|
|
|

|
|
|
|
|
|
|
|
|
|
|
|
## License
|
|
|
|
|
|
[Apache License 2.0](LICENSE)
|
|
|
|